
Pyramid USA Consultant, Jill Waegenaere, shares tips for using PECS with individuals with vision impairments
Many special educators implementing the PECS protocol often work with learners with visual impairments, including blindness. We often hear questions like, “Can we implement PECS with a student who is blind?” or “How can they ‘see’ the pictures?” and “Would you teach initiation the same way, by silently enticing with the preferred item/activity?” Fortunately, for me, I’ve had the pleasure of collaborating with Tamera and Nyssa, both of whom are teachers of the visually impaired. Both Tamera and Nyssa have been instrumental in helping successfully implement PECS with several learners with vision impairments and blindness. During a recent chat the three of us had on Zoom, I explained that I was writing a blog to help professionals implement PECS with learners with vision impairments and they were both excited to share information on this interesting and often perplexing topic. As a Speech Pathologist and Pyramid Educational Consultant, I can honestly say that the more I learn about vision impairments, Cerebral Vision Impairment (CVI) and blindness, the more I realise how much I don’t know! This blog will highlight teaching Phase I and II of PECS, tips on making 3D or tactile symbols and resources for anyone interested in learning more.
TEACHING PHASE I
When teaching phase I of PECS to learners with a vision impairment or blindness, both Tamera and Nyssa recommend using other senses such as sound, smell, and taste to signal the available reinforcer to the learner. They will often let a toy make “noise” and then put it into a basket, at which point the learner can then feel the item if they wish. They do not use touch or physical prompting without first alerting the learner auditorily. For example, Tamera has a learner who is blind, and they have a well-established relationship. When she is getting ready to work with him, she will say “get ready,” and when he holds his arm out and engages in assent behaviour and initiates, she will then use hand-under-hand physical prompting to guide him to the symbol, to exchange for the preferred item.
TACTILE SYMBOLS
We know that when traditionally implementing the PECS protocol we use 2D pictures which are often 1-2 inch labelled coloured line drawings. In general, both Tamera and Nyssa do not use 2D line drawing symbols for this population. They report that although some learners can “see” a 3 x 3 inch black and white picture (think of a typical line drawing of a pretzel), it can be hard for them to tell what the lines represent. W also 
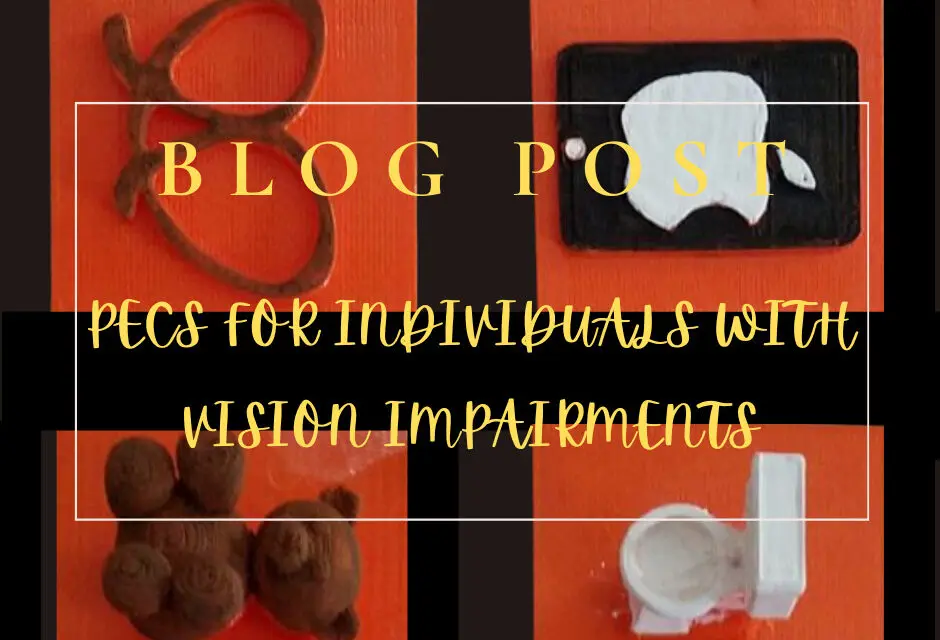
When making a texture based symbol for a learner who is visually impaired, we need to consider what the learner experiences, touches, or feels with an item or place. For example, if you want to make a bathroom symbol, take a step back and think about how the learner knows they are in the bathroom. Tamera and Nyssa explained that using a mini toilet eraser to represent the bathroom is difficult because a visually impaired learner doesn’t know what the eraser is. When in the bathroom, they might touch or experience the metal flush handle, toilet paper, the lock on the bathroom stall, etc. One of Tamera and Nyssa’s teams purchased a metal flush handle from the hardware store and made it the texture symbol for bathroom. The 3D texture symbols pictured below are from Tactile Connections which is a kit that helps teachers create a tactile card system that is individualized or standardized for visually impaired and blind learners who have additional disabilities and/or lack a formal means of communication or literacy. When making symbols they will often use small square hardwood floor samples from hardware stores and lids to containers from dollar stores to mount objects on.
TEACHING PHASE II
 Teaching Phase II or “Distance and Persistence” does present safety challenges. When working on travel, Tamera and Nyssa often use artificial landmarks. For example, they printed large photos of fish crackers for one learner, and she then uses her vision to locate and travel to the large fish cracker picture, to then exchange for the cracker. We also discussed the possibility of implementing a “call switch” to call the listener over when a learner cannot travel safely which is outlined in the PECS Training Manual, 2nd Edition. Towards the end of Phase II we teach the learner to carry the communication book. As with any Augmentative and Alternative Communication System, the learner should have access to the system at all times. Because 3D symbols are much harder to transport and don’t always fit into a book, they often use cross-body plastic cases to contain the thicker heavier symbols.
Tamera and Nyssa also report that they are teaching discrimination of the tactile symbols using the PECS protocol. They currently have a learner discriminating from a field of 3 preferred food items, implementing Correspondence Checks as we do in Phase IIIB of the PECS protocol (checking to make sure the symbol he hands over corresponds to the item he takes). I’m looking forward to hearing about his progress on my next visit out to Woodstock, Illinois. Thank you to Tamera and Nyssa for taking the time to chat with me about PECS and vision impairments. See below to learn more about the current shortage of teachers of the visually impaired, and resources for anyone looking to learn more about vision impairments, CVI or blindness/deaf-blindness.
RESOURCES
See Ability specialise in supporting people who have learning disabilities or autism, who may also have sight loss
CVI Scotland for free information videos on CVI
By Jill M. Waegenaere MA, CCC-SLP
© Pyramid Educational Consultants 2023